Showing posts with label design. Show all posts

Monday, March 5, 2012

Genius in the form of moss.

I'm desperately trying to find a place for this...
 
source
 Can you just imagine the possibilities?
It's gorgeous.


In your blender, combine:
  • 1 1/2 cups buttermilk
  • A few handfuls of moss
  • One teaspoon of sugar.
Blend until the mixture is smooth, and you’re ready to get painting!
You can use a brush to paint your moss onto concrete walls, rocks, or brick. Mist the moss once a day to help it thrive, and soon your green graffiti will take hold!

I'm also contemplating using the above recipe to create something like this little beauty for my bathroom.
What an amazing way to bring the relaxing outdoors in.
It would make my "little things" list every. single. day.

Wednesday, December 14, 2011

genius

Gorgeous......no?!?!
It's a bookcase - no...it's wallpaper.
it's genius.

Monday, December 5, 2011

Pretty Packages...

I've begun wrapping presents today.
None of them look as gorgeous as any of these, but boy....I wish they did.

Thursday, December 1, 2011

The Cozy Holiday Wreath

Welcome to December!
It's officially here.

I'm working on decorating my house and finishing up as many Christmas preparations as I can, so I will be able to enjoy the Holidays instead of running around like crazy desperately trying to finish everything up at the last minute.

In the midst of my preparations, I designed a little something I wanted to share with you today that will be 'warming' up my home this year.
All it requires is a few cheap supplies, a little time, and beginner skills with a needle and thread.
(my sewing machine is broken at the moment, so all projects must be done sans machine)


What I used:
Thrift store wreath form $1.00
Thrift store over-sized red sweater .50 cents
a needle and thread
 My sweater had a ribbed band at the bottom that I cut off.
It measured 19 inches x 6.5 inches. I used this as my first layer.

I had a little extra that I trimmed off.
(the size fabric you need all depends on the size wreath you are making.)
 I laid the wreath form on top of the band of sweater material,
 then I folded one side over the other and used a quick (and rather large) whip-stitch to hold the edges together.
For help with a whip-stitch watch THIS video.
 I continued all the way around...
 And ended up with this.
I made this my first layer because I wanted the finished wreath to be a little thicker with the sweater material.
 I cut a strip of sweater slightly wider than the first strip to compensate for the fabric already sewn onto the wreath form.
Then, I wrapped it around and finished it off with a whip-stitch just as I did with the first ribbed layer.

If you are using a wreath form that is already thicker, than you won't need a second layer.
 Then I cut one more strip of ribbed sweater material
(from the collar of my over-sized sweater)
and in the same fashion as THIS tutorial, I made a big bow.

The only difference is that I hand-stitched the pieces together and didn't do a top stitch.
Then, I just hand-stitched the bow to the covered wreath.

There you have it.
A nice, new, cozy wreath to welcome all the cold Holiday nights to come.
 

Friday, November 11, 2011

What I've been up to....

Lately, time has been troubling me....for lots of reasons.
I know this little "squeezing it all in" place has been shoved down the priority list as a result.

I'm so sorry to be leaving you on the back burner for a little while, but hours everyday have been spent on the computer...designated to the final production of these wedding pictures.

What wedding? you ask...
The wedding I told you about HERE.
It was a beautiful occasion and I had fun creating some special
images for a really special couple.

Here are a few of my favorites to share:


I'll be getting back to some more regular posting soon.
Thanks for understanding.

Have a wonderful weekend!

Monday, November 7, 2011

New Tradition: The Thankful Tree

Last year, Miss Emily Rose, from Simply Vintagegirl blogged about what she called "The Thankful Tree".
I've been trying to conjure up a couple new traditions for my little family and when I stumbled upon this one...I knew it was for us!
So I put together my version... with a $1 glass jar from the thrift store, some leftover ribbon and curly twigs.

 I had these tiny little pumpkins for a while and always been in love with them, but haven't found a really great purpose for them until now.
 The only other thing we need is a bowl filled with empty tags waiting to be filled with thankfulness.

I have challenged my manly crew to write something they are grateful for everyday this month...I'm participating as well.

So far, I'm really enjoying reading their thoughts as we begin to fill up our tree.

And when it's time to take down our tree I will save all the filled tags in an envelope marked with the year so we can always remember the "little things" we shared with each other.

I love this grateful time of year, but I wish we could keep it alive all year long.
I'm sure if we were always in a state of looking for the positive "little things", or blessings (no matter how big or small) in our lives we would all find ourselves much happier and more willing to serve one another.

This "Thankful Tree" might just need to remain a permanent fixture in our home.

Thursday, September 1, 2011

Back to School Sweater

Growing up, it was always tradition for my Momsi to take me and my sisters shopping for some special clothes for our new year of school. 
When our Popsicle came home at night, we would have ourselves some fashion show fun.
That's just what happens in a house full of girls!

Eventhough I don't attend school anymore, I decided to make myself a little something new. 
This would be so cute on a cardigan for your little girly too!

My Back to School Sweater
What you need:
 a sweater or cardigan
(mine was a $9 Target clearance cardi)
a tapestry needle
tape
yarn 
(match up the fabric of your sweater with the type of yarn you use so it will wash up well. 
My sweater was a cotton blend so my yarn was a cotton blend as well.)
 First, you will need a tiny piece of tape (just big enough to fit in the hole of your needle) to put on the end of a long piece of yarn.
Fold it over like this:

 Now you will be able to get your yarn through your tapestry needle soooo much easier!
Make sure you cut off the tape when you done threading the needle or you won't be able to pull it through the weave of the sweater.
 
 We are going to make a lazy daisy stitch. Make a knot at the end of your long piece of yarn and pull through the sweater making sure the knot is on the underside of your sweater.

Then, you want to go right back in the sweater next to the place you just pulled the yarn out of.

Don't pull the yarn all the way back through, instead leave a loop like this....the size of your loop will depend on the size you want your petal to be.
You are going to pull the yarn back through the end of the loop...
and go right back through the sweater on the other side of the loop, wrapping it around the loop of yarn.
Then pull, but be careful not to pull too tightly though...
you don't want to ruin the weave of the sweater, just add to it.
Keep going until you have yourself a little flower. 
Then add one small stitch in the middle for the center of the flower.
 I added flowers of all sorts of sizes and shapes to add variety.

The smallest of flowers was very simple, just a few small stitches.
First, come up through the sweater and eyeball how big or small you want the petals. 
Then pull the yarn back through.
Repeat as many times as you want petals.
There we go. I did a variety of 4 and 5 petal flowers all around the neckline.
Now I have a fun new sweater to welcome my students to learn.

So, whether you make a fun new sweater for yourself or you alter it for one of your littlies ...enjoy a fresh start to welcoming more learning and growth.
I'll be working on a new design and an alteration for all the littlest girlies out there.

Thursday, August 25, 2011

Give a face-lift to a frame...

I love finding vintage frames with character and my eye has been drawn to lots of oval shapes as of late.
So when I found this frame at my local thrift store I was SOLD right away ... and for $4 (it was 1/2 off day) it made the sale even sweeter! 
I'm not in love with gold - especially when it's a decoration in my home - so she's been sitting around the house for quite some time waiting for me to decide just exactly how I wanted to transform her.

I didn't want to just put a picture or quote in my frame ... I wanted to think a little more outside the box and come up with something unique.

The frame has a very rough edged piece of hand cut glass and hand cut piece of cardboard nestled inside which I didn't know what to do with, but I held onto it anyway....and I'm so glad I did!
That piece of glass is just what I needed to transform this frame into something more modern and unique.
So....I sanded her a little, gave her a fresh coat of paint and the transformation began. 

I used my silhouette machine and some vinyl to cut out the words from a quote I saw HERE and loved because it spoke to me of the immense amounts of joy my three handsome men bring to my life everyday.
(if you don't have a silhouette or cricket, you could easily print out your quote on paper and tape it over the vinyl ...then hand cut the letters out of your vinyl or you could even use contact paper)

Then I used my glass etching cream -I bought mine at Michael's with a coupon - it's a little pricey!
I just followed the directions on the bottle and when I was done waiting for it to do it's job, I peeled off my vinyl and washed my glass. 
I was so excited it worked, I squealed with delight because I had only ONE chance to get it right! 

To finish her off, I secured the glass with pins into the wood on the back and tossed out the cardboard.
Here she is in her place as an addition to my new favorite room in the house!
I'm in love with her new face-lift, now what do YOU think?
(Without the painting and drying the project took approximately 45 minutes.)

linked up with:
Blue Cricket Design
Not JUST a Housewife
Mommy by day crafter by night
Making the World Cuter
The Shabby Nest
30 Handmade Days
Whipperberry 

Wednesday, June 29, 2011

Creative "little things"

Wouldn't this just make the top of your "little things" every. single. day?!?!

I can imagine this could help start even the hardest of mornings with a beautiful smile.

Tuesday, June 7, 2011

Scalloped Paper Lamp

I've always been enamored with a good paper lantern...
the way it glows when illuminated and the feeling that beautiful, warm glow creates.
Just like this...
 (source)
Now, you can find alterations to a traditional paper lantern all over the place...
 (source)
and they are so beautiful!

Today's tutorial is all thanks to my love of illumination.

Back in April I showed you just a glimpse of my new curtains adorning the windows in my bedroom. 

After hemming those up, I decided to save the leftover fabric and I dreamed up the perfect use for it...

 I took our plain (and very inexpensive) ole' paper lantern lamps from IKEA we've had for forever

and turned them into this...

(in only 1 hour and 25 minutes)
So, let's get on with the show...

What you need:
a paper lantern
(you can do as many as you like - I embellished 2)

fabric
(I had 4 scraps measuring 27.5 inches x 9 inches each ...
that would come out to be approximately one yard or 1/2 yard per lamp)

fabric glue
(I used Elmer's Craft Bond fabric and paper glue)

scissors


I wanted my individual pieces to be about 2 inches in width so I cut up my fabric accordingly starting with 6 x 9 inch strips.
(I used 2 scraps measuring 27.5 inches x 9 inches for each lantern)

Then, I piled those on top of one another and cut them into more 2 inch strips. I was left over with a one inch strip that I saved in case I needed it.
Then, cut those strips into 2 x 2 inch squares. Now you have this...
(I used approximately 8 minutes to cut)
Then, I took each of those piles, 8 layers in each pile, (the fabric is VERY thin and sheer) and rounded all the edges until they looked like this...
(I used approximately 9 minutes to round all the edges)
Now we are ready to get all those rounded edges to make a scalloped lamp shade!

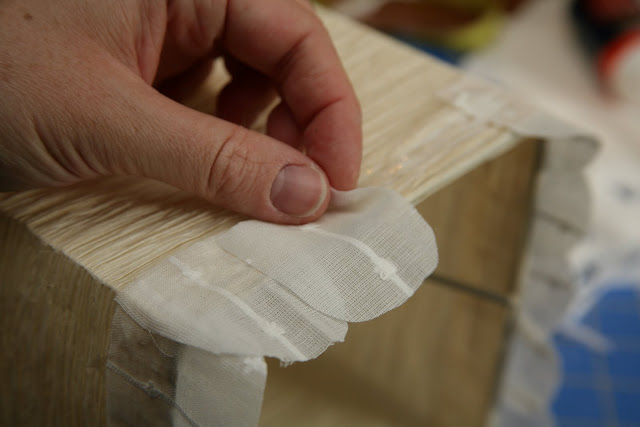
First, I used a Popsicle stick to apply the fabric glue ... just enough to get that fabric to adhere.


WAIT ... Let's stop for a second. Let's talk placement.
I knew I wanted about a 1/2 inch overlap with all my layers, so I started with placing my first row of pieces with a 1/2 an inch hanging over the bottom edge. This will keep it all consistent.
It also created my little scalloped trim ...

Okay ... push PLAY.

After smearing some glue, I placed each piece overlapping slightly with the piece before it going around the lamp.
(maybe 1/4 of an inch overlap).
Then made sure it was secure.
Then it looked like this ...
Once I was finished with the first row, I started the next row ... in the back of the lantern just in case my rows didn't all match up how I wanted.
Here is where the 1/2 inch overlap going up the lantern will come into play. I made sure that overlap would cover up my glued edges.
Then, I went around the lantern exactly how I did the first row.

Now, just keep going. You will start to see it come together ...
that's when it gets exciting!

Every once in a while my edges wouldn't stay down. When that happened, I just took a little bit of glue and smeared it on top of the aforementioned edges to keep them from curling.
Almost like I would on a Modge Podge project.

Keep gluing, placing and overlapping until you get to the top of your lantern and it looks like this ...
(I used approximately 66 minutes to glue all the pieces on)


Then, I took the pre-sewn hem from the sides of my curtain that I cut off earlier and glued them around the very top of my lantern to finish it off. You could use any trim you would like to finish it off.
Like this ...
(It only took 1 minute and 30 seconds to glue the trim on)
And that's it!
What do YOU think?
I wanted something I would love during the day ...
and illuminated at night ...
I set up the lamp in my room after I was finished to surprise Mr. Wilson. When he came home from work and walked up the stairs, I waiting patiently downstairs in the kitchen while I cut up a cantaloupe and enjoyed it's sweet aroma ...

I listened like a barn owl to hear any kind of reaction that would satisfy my need for excitement at the finished product. 

I counted each step.

As I heard him reach the top step and turn to enter our room I heard a loud, and excited, "WOW!".
THAT made every one of those 85 minutes worth it!
I sure hope you love this project as much as I do and give it a try yourself! 
I can't wait to show you how it came together with the rest of the room when it's all finished!


I'm linked up with ...
WhipperBerry
Eisy Morgan
our house of joyful noise
someday crafts
Related Posts Plugin for WordPress, Blogger...